5 Actionable Tips to Reduce Your AWS EC2 Costs Today!
Introduction
Amazon Elastic Compute Cloud (EC2) is a popular cloud computing service provided by Amazon Web Services (AWS). It allows us to rent Virtual Servers on the cloud to run various types of applications.
AWS EC2 provides a flexible and scalable infrastructure that is designed to meet the needs of different types of businesses. However, the cost of running EC2 instances can quickly add up, especially if the resources are not optimized.
In this blog post, we will explore actionable tips to reduce costs on AWS EC2 instances.
Use Cases for EC2 Instances
EC2 instances can be used for a variety of purposes, including web hosting, data processing, machine learning, and more. Here are a few examples of real-world use cases:
- Web Hosting: EC2 instances can be used to host websites and web applications. Users can choose from different types of instances based on their website traffic and resource requirements.
- Data Processing: EC2 instances can be used to process large amounts of data. Users can leverage EC2 instances to run batch processing jobs, perform data analytics, and more.
- Machine Learning: EC2 instances can be used to train machine learning models. Users can choose from different types of instances based on the complexity of the models and the amount of data being processed.
Factors Contributing to High EC2 Costs
There are several factors that contribute to the high cost of running EC2 instances. Here are a few major areas where EC2 bills generally shoot up:
- Oversizing instances: Running instances with more capacity than necessary can increase costs significantly. It's essential to choose the right instance type and size to avoid overspending on resources that aren't required.
- Running instances 24/7: Running instances 24/7 can lead to unnecessary costs, especially for workloads that don't require continuous processing. The instances should be turned off (with an automated Instance Scheduler) when they're not in use to reduce costs.
- Underutilization of instances: Running instances with low utilization can increase costs. It's essential to monitor instance utilization regularly and scale down or terminate instances that are underutilized.
- Over-provisioning resources: Allocating more resources than necessary can increase costs. It's essential to monitor resource utilization and scale resources as needed to optimize costs.
- Using on-demand instances: On-demand instances can be expensive for long-term and stable workloads. It's important to evaluate the pricing model and choose the most cost-effective option, such as Reserved instances or Spot instances.
- Inefficient use of storage: Inefficient use of storage resources can increase costs significantly. Optimal storage disks should be chosen for best application performance. Automate deleting unnecessary data to reduce costs.
- Inefficient use of network bandwidth: Inefficient use of network bandwidth: Inefficient use of network bandwidth can lead to unnecessary costs. It's important to optimize network usage, network routes and use content delivery networks (CDNs) to reduce data transfer costs.
Monitor EC2 costs regularly and identify the factors that influence high EC2 bills. Take appropriate action when needed by following the steps below.
Ways to Reduce Costs on AWS EC2 Instances
Choose the Right Instance Type
Choosing the right instance type is crucial for optimizing costs. AWS offers a variety of instance types optimized for different workloads. You should choose the instance type that best suits your workload requirements.
For example, if the workload requires high CPU usage, an instance type optimized for CPU usage would be a good fit. On the other hand, if the workload requires more memory, an instance type optimized for memory would be a good fit.

Steps to choose the right EC2 instance type for your workloads:
- Determine the workload requirements: Identify the computing requirements of your workload such as CPU, memory, storage, and network performance.
- Determine the type of workload: Determine the type of workload you're running. For example, if you're running a compute-intensive workload, you may want to choose a compute-optimized instance type.
- Evaluate the instance family: AWS EC2 provides several instance families with varying characteristics. Evaluate the instance families to find the one that best suits your workload.
- Evaluate the instance size: AWS EC2 provides multiple instance sizes within each instance family. Evaluate the instance size to find the one that meets your workload requirements while being cost-effective.
- Consider the pricing model: Consider the pricing model of the instance type. On-Demand instances provide flexibility and do not require upfront payment, but they are more expensive. Reserved Instances require upfront payment but provide significant cost savings over time. Spot Instances provide significant cost savings, but they are not suitable for all workloads.
- Test your application on multiple instance types: Before choosing an instance type, test your application on multiple instance types to find the one that performs the best for your workload requirements.
These steps can help you choose the right instance type on AWS EC2 that meets your workload requirements and helps you optimize costs effectively.
Use Spot Instances
Spot instances are spare EC2 instances that can be purchased at a discount compared to on-demand instances, offering us the potential to save up to 90% on their EC2 costs. Spot instances are a great option for non-critical workloads that can tolerate interruptions and do not need to run continuously.
The benefit of using Spot instances is that it allows us to take advantage of unused EC2 capacity at a lower cost, while still delivering the same performance and features as on-demand instances.
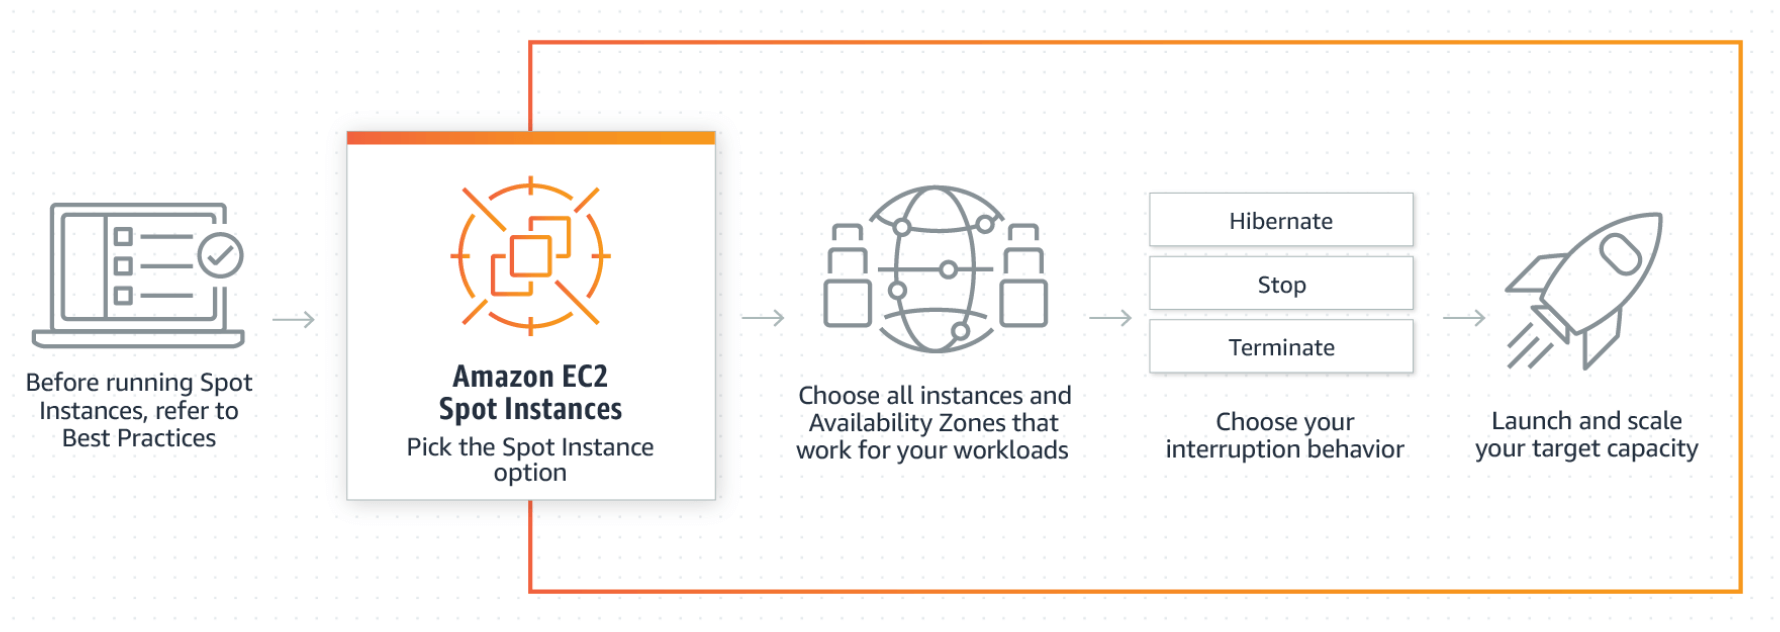
Steps to create a Spot instance in AWS EC2:
- Identify non-critical workloads: Identify the workloads that are non-critical and can tolerate interruptions. Spot Instances are suitable for workloads that can handle interruptions and are not time-sensitive.
- Choose the right instance type: Choose the instance type that meets the requirements of your workload. Spot Instances are available across all instance types, and you can choose the one that best meets your workload requirements.
- Set a bidding strategy: Set a maximum bid price for your Spot Instance. This bid price is the maximum price you're willing to pay for the instance. You can set a static bid price or use the Spot Instance Advisor to set a variable bid price.
- Choose the right availability zone: Choose the availability zone that best meets your workload requirements. AWS EC2 provides Spot Instances in all availability zones, and you can choose the one that's closest to your users or provides the lowest latency.
- Create a Spot Instance request: Create a Spot Instance request by specifying the instance type, maximum bid price, availability zone, and other parameters.
- Set up an Auto Scaling group: Set up an Auto Scaling group that uses Spot Instances to automatically launch and terminate instances based on demand.
- Monitor your Spot Instances: Monitor your Spot Instances using Amazon CloudWatch to ensure that they're running and to detect any interruptions. You can also use AWS CloudTrail to track Spot Instance launches, terminations, and interruptions.
Following these steps can help you effectively choose and create Spot Instances on AWS EC2 for non-critical workloads and optimize costs while maintaining performance.
Use Auto Scaling
Auto Scaling is a feature that automatically adjusts the number of EC2 instances based on demand. By using Auto Scaling, Cloud Engineers can ensure that they are only running the required number of instances at any given time. This can help to avoid overpaying for resources that are not being used.
Additionally, Auto Scaling can also ensure that your applications and services stay available and responsive, even during periods of high traffic.
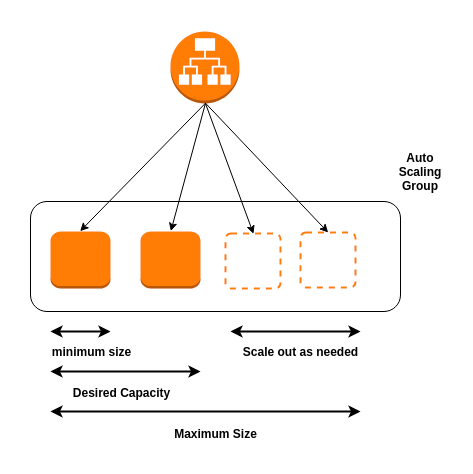
Steps for setting up Auto-Scaling on AWS EC2:
- Identify the workloads to be scaled: Determine which workloads are suitable for Auto Scaling. Workloads with fluctuating traffic patterns, such as web applications or batch processing jobs, are good candidates for Auto Scaling.
- Create an Auto Scaling group: Create an Auto Scaling group using the AWS Management Console, AWS CLI, or AWS SDKs. Specify the instance type, subnet, security group, and other launch configuration details.
- Define scaling policies: Define scaling policies that specify how Auto Scaling should respond to changes in demand. You can create scaling policies to add or remove instances based on CPU utilization, network traffic, or other metrics.
- Set up alarms: Set up alarms in Amazon CloudWatch to monitor the metrics used by your scaling policies. When a threshold is breached, CloudWatch can trigger Auto Scaling to add or remove instances.
- Test your Auto Scaling group: Test your Auto Scaling group to ensure that it scales up and down as expected. Use the AWS Management Console or AWS CLI to manually add or remove instances, and monitor how Auto Scaling responds.
- Monitor your Auto Scaling group: Monitor your Auto Scaling group regularly to ensure that it's scaling as expected. Use Amazon CloudWatch to monitor metrics such as CPU utilization, network traffic, and the number of instances in the group.
By following these steps you can configure Auto Scaling on AWS EC2. This will ensure your workloads can automatically scale up and down according to demand, enabling you to optimize costs and improve the availability of your application.
Use Reserved Instances
Reserved Instances are a cost-effective way to save money on EC2 instances. By reserving capacity in advance, you can save up to 75% compared to on-demand pricing.
Reserved Instances are available in three payment options: All Upfront, Partial Upfront, and No Upfront. The payment option chosen determines the amount of savings.
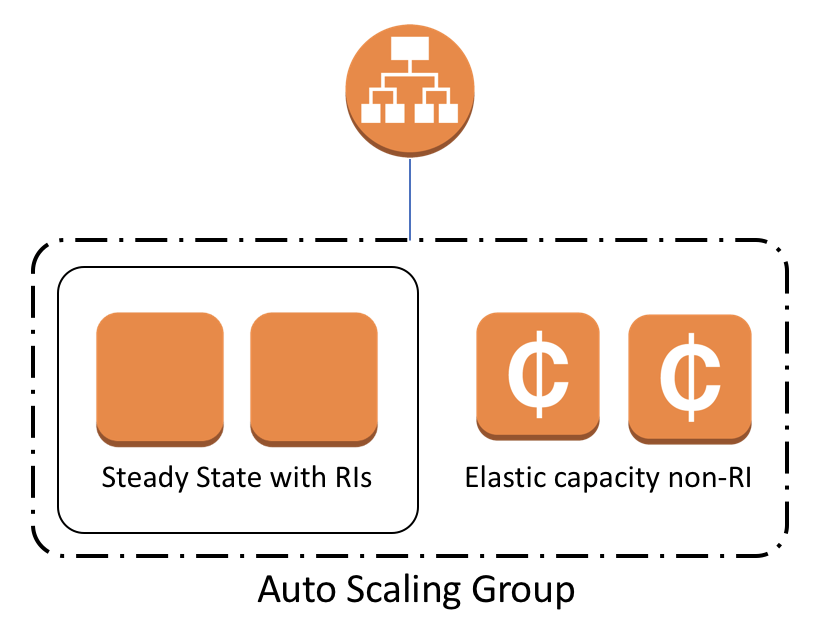
Steps for choosing and creating Reserved Instances:
- Analyze your usage patterns: Analyze your EC2 usage patterns to determine which instances are suitable for Reserved Instances. Reserved Instances are suitable for workloads with steady-state or predictable usage patterns.
- Determine the term: Determine the term for which you want to purchase Reserved Instances. AWS EC2 provides one-year and three-year reservation terms.
- Choose the instance type: Choose the instance type that you want to reserve. Select the same instance type that you're currently using, or choose an instance type that is suitable for your workload.
- Evaluate the payment options: AWS EC2 provides three payment options for Reserved Instances: All Upfront, Partial Upfront, and No Upfront. All Upfront provides the highest cost savings, while No Upfront provides the lowest upfront cost.
- Check for instance compatibility: Ensure that the Reserved Instances you're purchasing are compatible with your current instances. Reserved Instances are tied to a specific instance type and cannot be used with a different instance type.
- Purchase the Reserved Instances: After selecting the instance type, term, and payment option, purchase the Reserved Instances through the AWS Management Console, CLI, or API.
- Apply the Reserved Instances: After purchasing the Reserved Instances, apply them to your existing running instances. You can apply the Reserved Instances to running instances by modifying the instance attributes.
These steps help you strategically choose and create Reserved Instances on AWS EC2 to save costs and optimize your resource utilization.
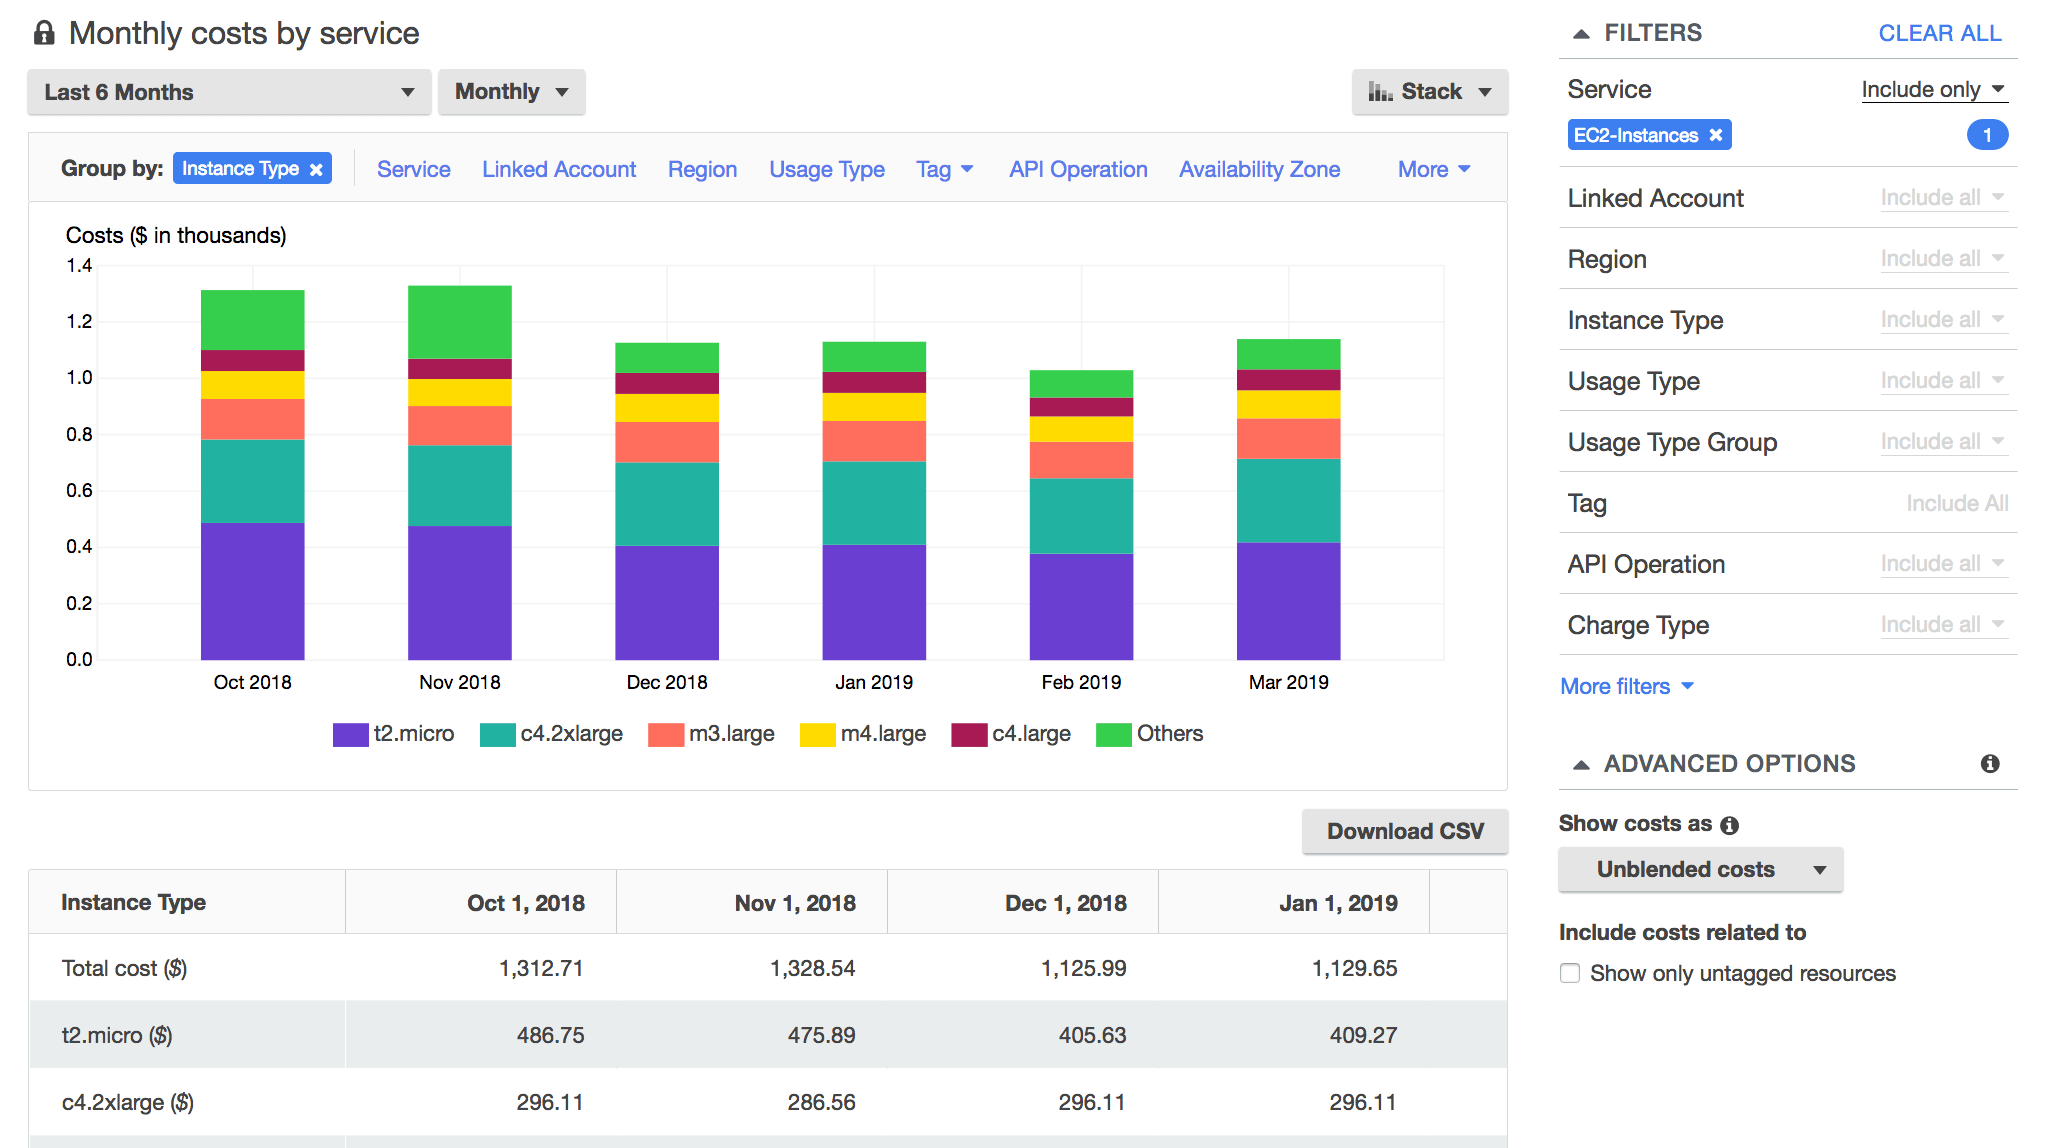
AWS Cost Explorer
AWS Cost Explorer is a tool that provides cost analysis and visualization for AWS resources.
It helps in gaining insight into EC2 usage and highlights opportunities to reduce costs. Features include cost forecasting, cost allocation tagging, and more.
Steps to enable and use AWS Cost Explorer to monitor EC2 costs:
- Enable AWS Cost Explorer: If you haven't already, enable AWS Cost Explorer on your AWS account to access EC2 cost reports.
- Navigate to the EC2 Dashboard: From the AWS Management Console, navigate to the EC2 Dashboard.
- Access the Cost Explorer: In the left-hand navigation pane, select "Cost Explorer" under the "Management & Governance" category.
- Choose the appropriate cost and usage report: In the AWS Cost Explorer, choose the appropriate cost and usage report to analyze your EC2 costs.
- Apply filters to your report: Apply filters to your report to analyze your EC2 usage by region, instance type, or tag.
- Analyze your EC2 cost and usage data: Use the data and visualizations provided by AWS Cost Explorer to identify opportunities to optimize your EC2 usage and reduce costs.
- Create custom reports: Create custom reports to monitor specific EC2 usage metrics over time.
- Set up cost and usage alerts: Use Cost Explorer to set up alerts when your EC2 usage exceeds a specified threshold.
- Share reports with stakeholders: Use the share feature to share reports with stakeholders in your organization to communicate about your EC2 usage and cost optimization efforts.
By following these steps you can use AWS Cost Explorer to analyze your EC2 costs and usage and identify opportunities to optimize your EC2 usage and reduce costs.
Steps Recommended by AWS to Save and Monitor EC2 Costs
AWS offers several resources to help you save and monitor costs of EC2. Here are a few recommended steps:
- Use AWS Trusted Advisor: AWS Trusted Advisor is a tool that provides recommendations for optimizing AWS resources. Trusted Advisor offers a variety of recommendations, including EC2 instance optimization, unused resources, and more.
- Use AWS Budgets: AWS Budgets is a tool that provides cost and usage tracking for AWS resources. By using AWS Budgets, you can set up custom budgets and alerts to monitor EC2 usage and costs.
- Use AWS Cost and Usage Reports: AWS Cost and Usage Reports is a tool that provides detailed usage and cost reports for AWS resources. By using AWS Cost and Usage Reports, you can gain insight into EC2 usage and identify opportunities to save costs.
Conclusion
Reducing costs on AWS EC2 instances is essential for optimizing resources and avoiding overpaying. By following the actionable tips listed in this blog post and using the recommended steps by AWS, businesses can save costs and monitor EC2 usage effectively.
Choosing the right instance type, using spot instances, using Auto Scaling, using Reserved Instances, and using AWS Cost Explorer are all effective ways to reduce costs on AWS EC2 instances. With these tips, companies can optimize their resources and run their workloads efficiently on AWS EC2.
It's important to remember that S3 is just one of many AWS services. Therefore, businesses should consider their overall AWS usage and costs when evaluating their cloud storage needs. By taking a holistic approach to cloud cost optimization and management, businesses can achieve significant cost savings while still enjoying the benefits of AWS's powerful suite of cloud services.
Learn actionable tips to reduce Amazon S3 costs today! 👇